


What is a Camera Lucida?
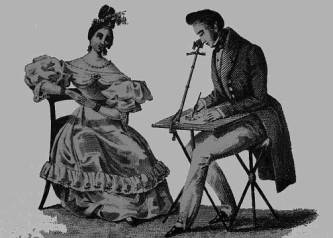
Latin for 'light chamber', the Camera Lucida, is an optical instrument that was invented in 1807 by William Hyde Wollaston to facilitate accurate sketching of objects. It consists of a prism with one reflective surface mounted on a small stand above a sheet of paper. The Camera Lucida works on a simple principle.
By looking into the prism from just the right angle, two images will enter the eye; one, of the object to be sketched, the other of the pencil and paper with which you intend to work with. The resulting effect is that your eye perceives the object as if it is actually on the paper. You may then trace the image with the pencil.
The Mechanism of the Camera Lucida
Light rays from the object are passing through the prism, and are reflected at an angle of 90° thereby putting these rays in the same line of sight as the paper and pencil. Your eye allows the image of the object to enter the upper part, and the image of the paper and pencil to the lower part, perceiving both at once and in the same plane.
Mounting the Camera Lucida
The instrument should be attached to the edge of the table you are working on. The bar to which the black prism holder is attached should be horizontal and the main telescoping rod should be fixed in a convenient position with the leaver at the base. The prism holder should be opposite both the center of the subject and the center of the paper on which the drawing is to be made. This is achieved by changing the inclination of the rod or by raising or lowering the prism holder.
How to look in your Camera Lucida?
The correct way to look into the prism is probably the most important thing to learn (be patient, it might take some time to learn). If your eye is too far over the prism, only the subject will be seen. If your eye is not over the prism at all only the paper and pencil will be seen. Your eye must be just at the edge of the prism. Only then you will see both images (note that both images will appear faint, so look carefully and patiently).
Maximum Sharpness
A uniform lighting of the object and paper is recommended. To see the top of the object, move your eye backward. To see the bottom of the object, move your eye forward. Do not draw until the image is sharp. Move the object toward or away from the prism until a maximum degree of sharpness is obtained.
Changing Image Size
You can enlarge or reduce the size of the image on the paper by changing the distance between the prism and the paper and pencil. This is done by raising or lowering the prism using the telescoping system in combination with using a proper lens for focusing.
 Print
Print